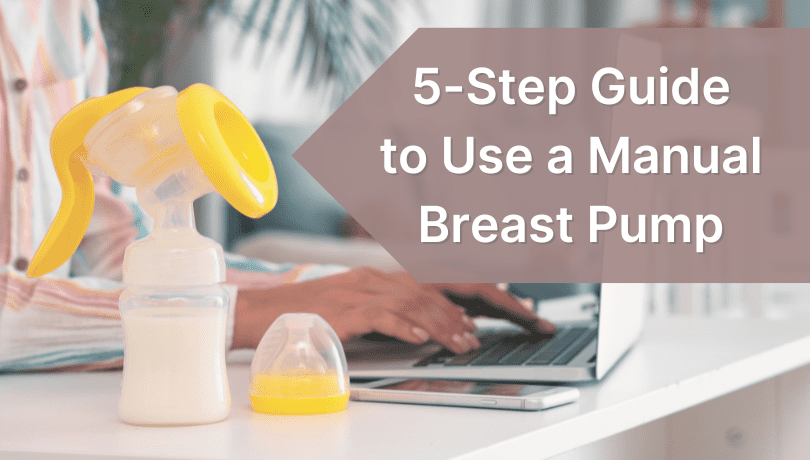
Easy 5-Step Guide to Use a Manual Breast Pump
Hello again! How have you all been? Let’s talk about pumping today.
I’ve used electric and manual breast pumps many times over the years, and I still prefer using manual breast pumps because they are so hassle-free. But I also understand that many mothers find it difficult to use it effectively.
So, I’ll give detailed instructions on using manual breast pumps (AKA hand breast pumps) and when you should consider power pumping. Not only that, but I’ll also address the questions that moms in the community have about low milk supply, uneasiness, and similar issues.
Let’s get started!
Table of Contents
Understanding Manual Breast Pumps
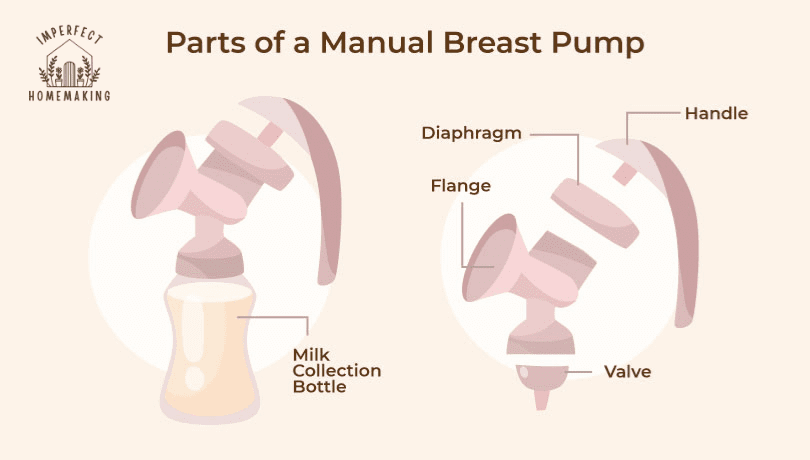
Manual breast pumps have a handle connected to the suction components and a valve that drops to the milk collection bottle. These pumps go on one breast at a time, and you pump by hand.
You just have to place the pump over your breast and use your hand to press down on the handle to start the suction.
- You can take manual breast pumps anywhere since they are lightweight and portable.
- There’s also nothing to plug in since they don’t need power outlets or batteries, with zero pesky wires or complicated settings.
- They are also more affordable than electric ones.
5-Steps to Use a Manual Breast Pump Effectively
Now that we understand how a manual breast pump functions and how it benefits us, let’s dive into how to use it.
Before You Start
Generally, breast pumps have flanges that fit over your nipple and areola.
Now, getting the right size of flanges is vital because
- a size too small can cause pinching and pain around your nipple,
- and a size too big does not give enough suction.
So, please choose a flange size that fits you well. I’ve also written more about finding the correct flange size if you need information.
Step 1: Set Up Your Space
I’ve mentioned this before: it always helps to clean and sterilize your pump after every use because you just need to take it out of your bag when you next need it.
- So, wash your hands with soap and water, and remove your pump from the sealed bag.
- Assemble all the parts and keep your milk collection bag or bottle ready.
- Settle down in a quiet room and relax before you pump.
I always think of my babies during this time – holding and nursing them. These happy thoughts help me with the letdown reflex. While I do this, I also massage my breasts a little bit, hum some tunes, and just relax.
Step 2: Attach the Pump
Next, it’s just about positioning the pump on your breast. I take my time doing this because I want the pump to be as secure as possible!
- I place the pump on my breast with the flange centered around my nipple and areola.
- Then, I seal it by gently pressing down with my thumb or index for it to stay firm on the breast while pumping.
Your letdown reflex should have kicked in at this point. Now, you can start pumping!
Step 3: Pumping
Grip the pump’s handle, and you are ready to start. Here’s how I usually do it:
- I press the handle down and release it to create suction. I repeat those motions to get a steady rhythm and check if milk flows into the bottle.
- Moreover, I also start with a gentle suction power and increase the speed based on how much milk empties from the breast.
- I pump for 15 to 20 minutes to empty my breast or finish it even earlier if I’m not making enough milk that day (and that’s completely fine!).
- Next, I switch to the other breast and repeat the same process.
If you have concerns that your milk supply is slowing down or the flow isn’t cooperating, try massaging your breasts again or slow down your pumping rhythm. Take it easy. You’ve got this!
Step 4: Storing
Now, you make sure you store your pumped milk.
Here, I’m giving a short version of how to store breast milk. So, if you need more details, please check out my article on reheating and storing breast milk.
- First, detach the milk collection bottle or bag and label it with the time and date of the pump session. Your bottle or bag should be for breast milk storage only, and I recommend using BPA-free containers.
- If you’re at work or traveling, store it safely in a freezer nearby or an ice box. I carry an ice box while traveling to keep my pumped breast milk.
- When you are at home, store your milk in your fridge or freezer and thaw it to use it.
Step 5: Cleaning Up
Next, you need to clean your pump. And I recommend you keep your soap and scrubber ready even if you are not home.
- In your wash basin, detach the pump parts and wash off leftover milk.
- Then, use a soaped-up scrub to remove any residue and rinse again.
- Now, let it air-dry on a clean, dry towel away from dirt and moisture.
- Next, sterilize them with hot water, microwaveable steam sterilization bags, or steam cleaning machines before you seal them in a bag.
At the office, I would pack up my cleaned and air-dried pump in a sealed bag and sterilize it once I reached home!
P.S. I’ve elaborated on sterilization and microwaveable steam sterilization bags in my article: cleaning, sanitizing, and sterilizing breast pumps, if you are keen to know more.
Does Your Breast Pump Feel Uncomfortable?
When I bought my first pump and began using it, I was experiencing such a low milk flow when compared to breastfeeding. I also routinely get questions from mothers about why their breast pumps feel so uncomfortable.

Here are some steps to address these common issues.
1. Low Milk Flow
A low milk supply could indicate stress that makes the letdown harder or that the suction strength is too low. There are a few changes you can make to improve on these issues.
- I’ve learned that to pump, you need a quiet and relaxed space. So, find your calm room, loosen up those muscles, massage your breasts, and nurture the right headspace before you begin pumping.
- You can also try pumping in the early mornings or nights. A mother’s milk supply is higher during that time and might prove helpful to you.
- Doctors also recommend adjusting your suction power to mimic your baby’s nursing rhythm to make pumping as close to breastfeeding as possible.
2. Uneasiness
An uncomfortable breast pump is just not helpful, is it? So, if you’ve got that strange feeling where your pump feels uneasy, but you’re not sure why, these checks can help you out:
- Sometimes, you can stop and take a break if your pump feels uncomfortable. It helps to wait until the feeling passes, and you can resume pumping again.
- Other times, the uneasiness could mean your nipples are dry or sore. Invest in a good lanolin nipple cream to resolve this problem.
- If your uneasiness is related to breast engorgement, it helps to put some gentle pressure on the breasts while pumping.
- If this discomfort resumes every time you try to pump, see if you have a poor-fitting flange. A well-fitted flange shouldn’t pinch the nipple or cause chafing. So, consider changing the flange size if this is frequent.
If these problems continue, I strongly suggest you visit your lactation consultant or doctor and discuss the issue in detail for your peace of mind.
How to Power Pump Breast Milk
Right out of the gate, I think it’s crucial to tell you that power pumping is for mothers experiencing consistently low milk supply. Even if you are dealing with low milk, I’d suggest you take the advice of your lactation consultant before you consider power pumping.
Power pumping is a technique that mirrors cluster-feeding in babies.
- In power pumping, you pump intensely for shorter durations and then follow up with rest periods.
- So, yes, these techniques can help improve milk supply, and you don’t need medications or supplements to start.
Power Pumping Using a Manual Breast Pump
- Similar to the steps to use manual breast pumps, set up a quiet space for yourself. Then, wash your hands and assemble your sterilized pump. I also massage my breasts a little, think of my baby, and wait for a let-down.
- Next, we power pump. Below is one possible schedule for power pumping. Mothers also follow different schedules based on advice from lactation consultants.
I’m going to show you a Pump-Rest-Repeat cycle continued over one hour.
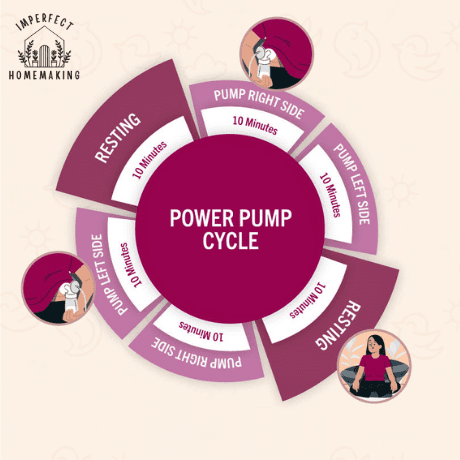
1. Power Pump
- Set a timer for 20 minutes and attach the pump to one breast. The idea is to pump 10 minutes at each breast.
- At this point, you should also remember that you need to pump at a faster rhythm than usual with a higher suction strength.
- So, pump fast with more suction power for 10 minutes at one breast and then switch to the next breast for another 10 minutes.
2. Rest
- Once the timer is up, rest for 10 minutes to recover from the power pump.
- Drink lots of water, pat yourself on the back, and enjoy your 10 minutes.
Please don’t skip this rest period because it helps to prevent soreness in the nipples and breasts.
3. Repeat
- Repeat the power-pumping and resting cycles for a total of 60 minutes
- Ultimately, the goal is to empty the breast to simulate more milk production. And please be patient! Power pumping doesn’t give immediate results. It takes at least five days or more of power pumping to see results.
4. Cool Down
- Once you finish your one hour of power pumping, massage your breasts to relieve soreness. You can even apply a warm towel to rest and recover.
Please power pump once a day for 3-5 consecutive days, preferably when your milk supply is lower. And always, I recommend talking to your lactation consultant before you begin anything like power pumping.
Concluding on Manual Breast Pumps
I’ve always kept a manual breast pump handy for my children’s feeding needs because they are simple and easy to use, particularly if you are traveling or power pumping!
I’ve outlined a step-by-step guide to use these pumps and given you a schedule I used to follow for power pumping. We’ve also discussed the common issues with pumping and how to solve them. So, take it easy! And if you’ve got questions, you know where to find me!
See you in the next one.