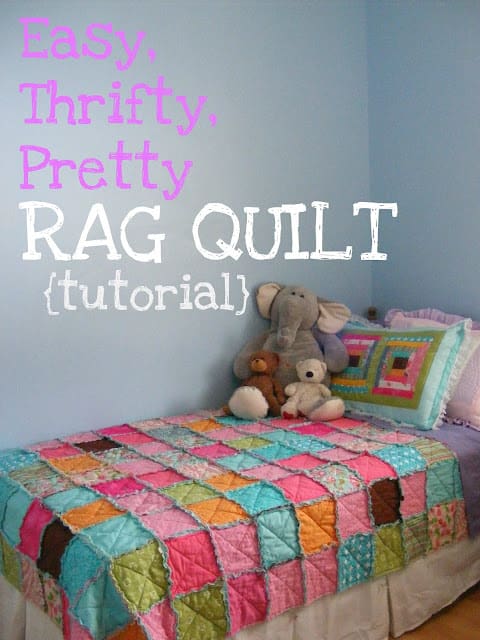
For Christmas I made my 3 year old daughter a rag quilt for her bed. And in my very imperfect fashion, I left it a little late. Like, um, oh....CHRISTMAS EVE.
I started off well, I was cutting the pieces a whole month before the big day. But in the hubbub of life I managed to put the rest of the project off. But it's okay. Because the gift was ready in time. And you know what? Now I can assure you that this is the kind of project you can finish in one evening. In one insanely long evening.
Or maybe you'll choose to sleep occasionally and stretch this project out over a few days or weeks? To each her own...
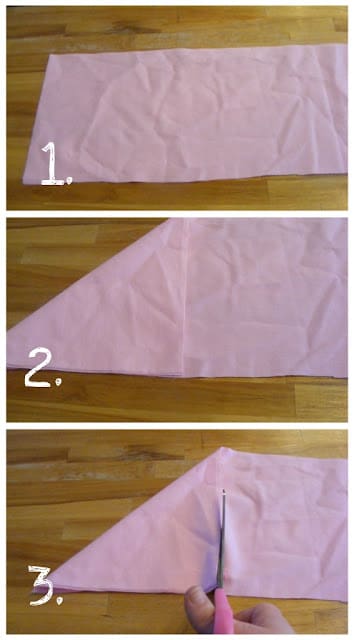
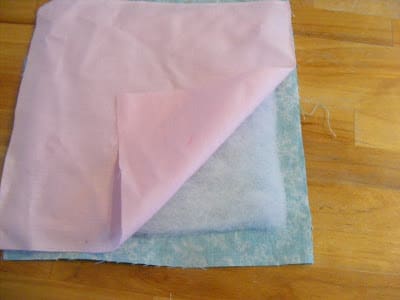
Step One. Cut your pieces. I cut mine to be 7 inches square. At this stage you don't have to be particularly precise....you'll see why later. An easy way to cut your squares is just by cutting some strips that are 7 inches wide (or whatever size you need) and then turning an edge over to make a triangle. Cutting along the edge of the triangle will give you a decent square.
Step Two: Cut a boat load of squares of quilt batting. Mine were 6 inches square. My quilt has 10 rows of 13 squares, so I needed 130 squares of batting and 260 squares of fabric.
Step Three: layer a piece of batting between 2 fabric squares and machine stitch a X across it.
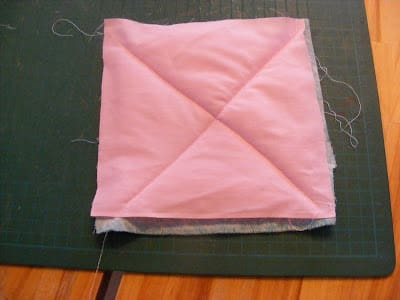
Step Four: As you can see my pieces aren't perfectly lined up in the quilted square pictured above. What I found is that even if you start off with 2 precisely cut pieces of fabric, it can be difficult and tedious to keep the layers nicely lined up. And, between you and me, I am more likely to stab myself in the eyeball with a seam ripper than complete a project that is tedious and time consuming.
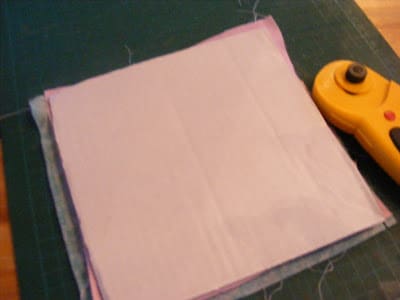
So I solved the problem by cutting the squares fairly imprecisely (as mentioned in step one) and not worrying too much about keeping everything perfectly in place while stitching. Instead I just cut the finished square again with a rotary cutter and a 6 1/2 inch cardboard template. The result is nicely lined up and precise squares without having to stab myself in the eye out of sheer frustration.
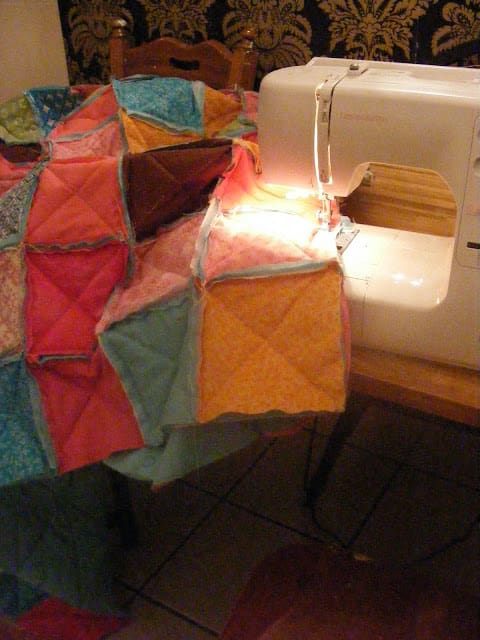
Step Five: Once you've completed steps 3 and 4 with all of your cut pieces, you can begin assembling your quilt. Remember to sew your squares together wrong sides together. I had to rip a few seams out because I kept forgetting that I want the seams on the right side!
Step Six: Sit down to a few good movies with a sharp pair of scissor and snip all of the edges so that the seams will fray up nicely. Be careful not to cut any stitches.
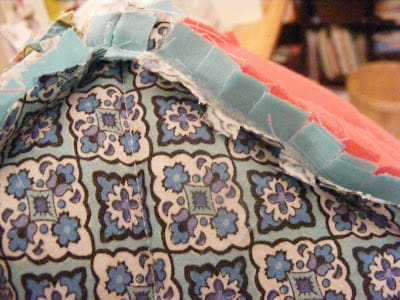
Step Seven: Wash and dry the quilt to get the seams to fray nicely. It will take a few washes to get really frayed, but if you're in a hurry (and I was) one wash will be a good start.
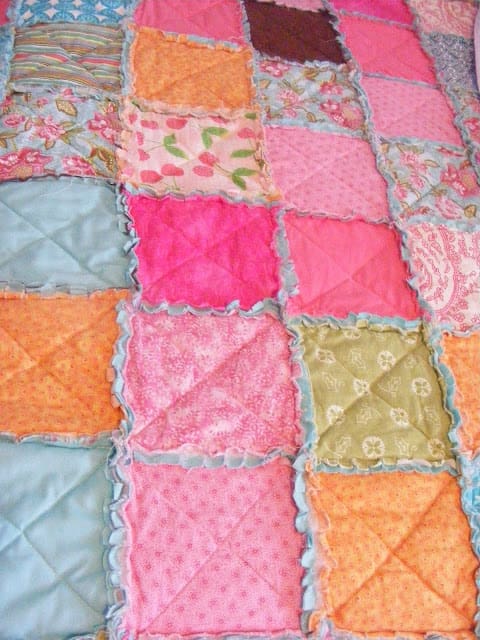
Don't these colours just make your heart happy?
Thanks so much for visiting The Complete Guide to Imperfect Homemaking. Please take a moment to "like" me on facebook or follow me on twitter.


So beautiful! And inspiring! I love your solution to having even quilt squares- brilliant. Going to have to do this for my kids!
ReplyDeleteI love this and I want to try to make one. But I need help-- I'm craft impaired! I understand how you made the individual squares, but how did you sew the squares together so that there'd always be frayed edges? Did you try match the batting up and sewed that together? How does the underside look-- is it frayed, too? And the frayed edges make perfect lines all the way across and down the quilt... how did you do that if you didn't worry about matching everything up perfectly?
ReplyDeleteAfter step 4 all your quilted squares should be exactly the same size. So when you sew a row and then another row and then sew the two rows together, the seams will all line up. Just make sure you always leave the same amount of seam allowance when you are sewing. The easiest way to do that would be to use the side of your pressure foot as a guide along the edge of the squares.
DeleteThe underside is all smooth and looks more like a traditional quilt. I should've gotten a photo of that side! Sorry :)
I don't understand what you mean by sewing them wrong side out. You are sewing an x through them, so wouldn't you want them sewed the right way? I know when I have made a quilt before you place the 2 sides that you want on the outside, together and sew around until you get to a corner to where you can pull it out and then hand stitch that one area.
DeleteAre you meaning the quilt pieces and the backing? Also, how are you sewing the individual squares together?
Also, how much do you leave on the outside when you sew them together so you have the extra to cut for fray?
DeleteFor the "wrong side out" I believe it means do the opposite of what we normally do. Ex: Normally you put the printed "pretty" sides together and sew around and then turn inside out. After that, the ugly stuff would be hidden inside..
DeleteFor this, if you put the uglies together and sew the edges, the frayed edging will then stick up on the "pretty side" which is the look we're going for. Its just counter intuitive.
I think quilts are usually a 1/4" seam allowance but I'm sure you can do whatever you're comfortable with, it will just change the size of your quilt by a tiny bit.
I hope that helped! I plan on trying to make this tomorrow-ish... so we'll see!
I have all the "x"s made on my squares. Now, I don't know how to sew the squares together. You talk about sewing on the "wrong" side of the material, what does that means when sewing the squares together? Thank you.
DeleteTake 2 squares and place them together with the backing fabrics facing or touching each other. Sew them together and the seam should show through on the front when you unfold them. Continue this way for the entire row. Then sew the rows together in the same manner. I usually do a 3/4 inch seam allowance so that there is enough of a tab to cut for fraying.
DeleteInstead of putting the RIGHT sides together to sew them as you normally would, put the WRONG sides together and sew them. Make a long row...the length of the quilt. Make a second long row, THEN put the BACKSIDES of the two rows together and sew the full length. Do the same with the rest of the squares. Hope this helps to clarify.
DeleteYou have your squares with the X's on them, pick which fabric of the 2 you want to be on the front of the quilt, that is the "right" side. Keep the seam allowances facing that fabric.
DeleteThis is sooo beautiful. You have a great eye for the colors that go together. I never could understand how people do this from scraps!
ReplyDeleteIt turned out beautiful! The colours are amazing. Your girls are so lucky to have a mom who can sew them gorgeous things! Did you make the pillow sham to go with it?
ReplyDeleteActually, my mother made the matching pillow sham as a Christmas gift. Didn't she do a lovely job!?
DeleteFantastic colors! What a wonderful heirloom gift for your daughter. I wonder if I could pull off something like this...
ReplyDeleteYou can do this. Rag quilts are very forgiving! No need for perfection. I've made several and am by no means a real quilter.
DeleteYou can make this. One of my friends who NEVER did ANY sewing of ANY KIND started making these for her children. When she came to my home and brought one with her, I asked who made it and she said she did. I didn't believe her but it was truly the truth!!! If you have a sewing machine, you can make this. I cut my squares with my rotary cutter as it goes faster than scissors one square at a time. Good Luck....you'll do great
DeleteGorgeous! Love it! Thanks for sharing. I especially love the tip about waiting to square-up the squares.
ReplyDelete-Sandy
Love rag quilts! And this one is so pretty.
ReplyDeleteI've made one for each of my kids...and you're right about needing a long movie. That cutting/fraying at the end kills me (and my hand) every time!
I have made many of these rag quilts and bought a special pair of scissors at our local quilt shop to cut the ends. The scissors make a BIG difference. I would recommend investing in a pair if you intend to make these quilts often.
DeleteWhat kind of "special scissors"? Do they have multiple blades? or are they just extra sharp?
DeleteSpring-loaded!
DeleteBeautiful quilt! I want to try this!
ReplyDeleteI have just shared your fantastic tutorial over on my blog! Great work, it is beautiful!
ReplyDeleteP>S> I am your newest follower!
http://sewcooklaughlive.blogspot.com.au/
For my granddaughter (probably her 3rd Christmas when she will be a little over 2)I am planning to make a box house and quilt for her own little private reading nook. (A frugal thought-filled gift) I will keep these directions aside for that. I also like your pillow covers.
ReplyDeleteThis comment has been removed by the author.
ReplyDeleteI have made several of these rag quilts. Because you are ending up with a frayed edge, even if your don't recut all of your squares you can make it work. I usually use flannel because it really frays nicely. I use white flannel as the layer in between rather than batting because it too frays. Nice job and the colors are very pretty together.
ReplyDeleteOooh, good idea on the flannel!
DeleteYes, I agree the white flannel works much better. It frays easier and is very warm.
DeleteI've never done or seen one of these- what do you mean by frayed? I'd love a video or the steps :) I might get my sewing machine fixed and try this! Thanks for sharing!
ReplyDeleteYes they do. Make my heart happy! Oh the beautiful things one can make for a little girl!
ReplyDeleteWell, I have g.sons only one g.daughter, Could you use light weight blue jean material and other material to do this? G.G.
DeleteYes, you can! I am in the process of making one out of flannel and old blue jeans (I just need to finish fraying the edges), and it looks and feels great so far.
DeleteHi there! I came across your awesome quilt on a post from a friend. I love it! I am terrible at sewing, so I've been looking for a quilt to make for my 2 1/2 year old that doesn't require me to be perfect. It looks so great! I am definitely inspired! I am a new follower! :)
ReplyDeletePlease check out my blog at www.eliandellie.com to see some fun tutorials, recipes and giveaways.
-Abi
Such a CUTE quilt!!! My girls would love it as well. I'm so glad you said it doesn't have to be perfect, my sewing is far from it! I'm a new follower of your blog! Thank you for all of the great ideas and posts.
ReplyDeleteI would like to award you the Versitile Bloggers Award. Have a blessed day!
I love this quilt!!! I have tons of fabric scraps and also love quilts but don't have the time to quilt them. This individual square method is brilliant, thanks for sharing.
ReplyDeleteKaren
That truly is stunning! My teenage daughter would love that.
ReplyDeleteX x
I have to try this! I'm going to use all my baby's adorable receiving blankets!
ReplyDeletewhat a great idea! an excellent keepsake...
DeleteI love it. I've been wanting to try quilting and this seems like a pretty easy one to start on. Thank you for sharing this with us.
ReplyDeleteI love all your colors. I've seen another one done and she used flannel. Did you use regular cloth? did you have any issue with fraying?
ReplyDeleteThanks!!
I've read that flannel is the best. I used cotton and it turned out just fine.
DeleteI've recently made 2 of these, the first I used cotton quilters fabric, the 2nd I made with flannel. For both I used a square of flannel in the middle instead of the batting. Just cut the flannel square the same size as your other squares and you can skip the "sew an X" step since the flannel will be sewn along with the top and bottom layer.
DeleteAlso, with the flannel in the middle, you can pick an accent color to help make other colors in your quilt pop more. I used black and it was amazing.
Another tip for fraying the edges if you're impatient (like me) is to take a comb, you know the kind that the barber uses and comb against the frayed edges. It pulls up a lot of the threads before you wash/dry it so it saves your dryer and leaves a nice fray too. :)
ReplyDeleteor.....if you have pets you can borrow their "slicker brush" and go at the fraying seams. using a loosely woven backing will give you a lot more "fry" also.
Deletethat would be "fray" not "fry"........
DeleteI think I finally found a quilt I can make! I have scads of quilt scraps and this is on my project to do list now. The colors in yours are so pretty - she looks thrilled with hers (:
ReplyDeleteOh my goodness..... amazing! I've never started quilting because I thought it was too hard, but this project looks like something I could actually do. Thanks for the great tutorial!
ReplyDeleteGorgeous! And someone looks pretty happy with her Momma's work! Thanks for sharing
ReplyDeleteYour quilt turned out so cute. I just made a rag quilt but am stumped on how to finish the edges. Do you stitch them and then cut and fray or did you bind the quilt?
ReplyDeleteI stitched the edges twice, cut and frayed.
DeleteConnie, for what this is worth, you really can do whatever you want to finish this quilt -- there's really no right/wrong way. I've seen them binded and seen them frayed around the edges and neither way detracts from the quilt. I've also see the squares cut with a rotary quilting wheel instead of a straight edge for another way to be a little different. I can't wait to make one of these... Kelly's tutorial is awesome. Happy sewing!
Deletehow much fabric did you use? Any idea? It is great!
ReplyDeleteCute cute cute! I've been thinking of making my kids quilts in almost those same colors! I was thinking robin egg blue, that color orange you have and gray for the boys and then robin egg blue, orange, and pink for my girl! I think I need to add another color though. Really cute! I'm loving your blog!!! Did you happen to take a picture of the back of your quilt? Is it just that one print on the back? That's the only thing I didn't know how you did.
ReplyDeleteI am IN love with this quilt!!!!. New follower of yours :). Come on over to Miss Mommy sometime :)
ReplyDeleteANY chance of making me a quilt?????
Adorable!
ReplyDeleteLove those Christmas Eve projects; only 2 am this year! Finishing a quilt, a dress, a doll, a stocking, all part of the drama and mystery of giving a gift that is special enough to be home made. many prayers, many stitches, blessing the one who receives it. Grandmahollymom
ReplyDeleteI have been looking everywhere for a blanket for my two little girls' beds that would incorporate the baby blue carpet, brown walls, and each of their favorite colors (pink & yellow). THIS IS BEAUTIFUL!! I'm going to try this today!! :) thank you so much for sharing. God bless you!!
ReplyDeleteLove the quilt. The expression on your daughter's face says it all!
ReplyDeleteI made something similar, a few years back, with anti-pill fleece, but the frayed edges give it great personality. Thanks for the idea.
Love this! I plan to make one for my daughters new room. What size is this quilt you made? I'm trying to figure out how many squares I need for a full size.
ReplyDeleteHmmm...I have boxes, and boxes of all my daughters' old baby clothes. I think I know what I am going to do with them now. Thank-you so much for the inspiration - 2 rag quilts coming up for two birthday girls this year. Yay!
ReplyDeleteI love this! I just stumbled upon your site. Great job.
ReplyDeleteLove the beautiful colors, want to make one for my granddaughter. How did you purchase your fabrics... by the yard or by fat quarters, and how did you pick the colors?
ReplyDeleteWhat a great idea! I LOVE to quilt and this will make a FABULOUS gift for someone! Thanks for sharing!!
ReplyDeleteLove it!...going to try to make one. My back is solid brown with the front blocks being teal, brown & ivory patterns. What color thread should I use? Brown or Ivory?...just thought the brown would be too dark for the front, but the ivory would be light on the brown back...could be I'm just overthinking it and it wouldn't matter either way!...lol...
ReplyDeleteI think you sould use teal thread. Brown and teal look awesome together so it'd be great on both sides!
DeleteThis is so pretty,I love your colour choices too.A winter project for my granddaughters maybe? :).
ReplyDeleteVery nice!!!!! I would like to try this too.
ReplyDeleteThis is sooo cute and I love the colors!! I have a question, how did you do the bottom side of quilt? Is it all the same color or did you use diffresnt pieces likw you did on top?? Thanks so much!!
ReplyDeleteI like the idea of using receiving blankets. I'm going to look for some on sale or clearance at stores so I can make one for my niece that is expecting in June.
ReplyDeleteI love this quilt. It's beautiful! My question is....what size of seam allowance did you use to sew the 6 1/2" squares together with? Normally the seam is a 1/4' but yours looks much bigger. I'm new to pinterest and I'm so glad I found your post. Thank you so much.
ReplyDeleteFound this on Pinterest and I just have to say...I am in love with this quilt! AmAzInG!!! I have GOT to make one for each of my girls!!! Thank you so much for blogging about this and sharing your talent!!!
ReplyDeleteBeautiful, I wish I had seen this before I bought my girls new comforters. I though quilts were way out of my skill level, but you make this all so very clear. Next time!
ReplyDeleteHi Kelly, this is beautiful and the directions are so clear. Thanks for sharing it. I do have a question -- what seam allowance do you use? It seems that the standard 1/4" for quilting would be a little too shallow to fray nicely. Thanks again!
ReplyDeleteTHANK YOU for this blog!!! I have only recently begun to quilt and have pieced together 1 quilt so far - (thats not finished) HOWEVER I saw this the other day and thought to myself "cant be that easy" ... "something like that will take me ages" BUT 3 nights of sewing after my children are in bed and i have succeeded in making (& finishing) MYSELF a gorgeous raggy throw for my bedroom so THANK YOU AGAIN!!!!
ReplyDeleteyou are awesome! how did you manage with all those little faces to look after? you must never sleep! my Mom has made these for my girls and they are so warm, she has also made them for the BOYS in boy colors. they last forever and only get better with each wash
ReplyDeleteI just wanted to say, there are special spring loaded scissors to do the clipping! I bought some after doing two rag quilts and it makes it go so much faster. Fiskars Micro Tip scissors no.5. They are fantastic!!! Love your quilt!!
ReplyDeleteThank you! My hands are killing me from all of the snipping. Can't wait to get me some Fiskars Micro Tips! :)
DeleteLove it!
ReplyDeleteI love this quilt and want to try one of my own. I am new to sewing but this looks like something I could do. One question I have is how did you finish off the outside edge of the blanket. Did you use a banding around it or did you let it be a frayed edge as well. Thank you so much!
ReplyDeleteIs there any way I can print this so that I can have the tutorial handy when performing the steps?
ReplyDeleteYour quilt turned out Beautiful. thank you for the wonderful idea. I was looking for an easy quilt idea for my two grandsons, and this will be it. I plan to use their baby bedding set that I purchased when they were born. So I will up cycle the crib bumpers and bed skirt into a quilt, and I won't even have to bye the batting as the bumpers has more than enough for the job. I'm excited to get started. thank's again for the wonderful idea.
ReplyDeleteLisa from Jacksonville, Fl
The quilt is beautiful!!!
ReplyDeletei have a question about the backing. i just started a quilt for my daughter that i made out of her receiving blankets. it's not a rag quilt though and i'm not using batting because it's too hot here for that. are your squares perfectly lined up? mine aren't and it drives me batty! also i was looking for ways to finish my blanket...i don't want to tie it off because i don't like the way it looks...but i kind of like the x's you did in the squares. is it as simple as after i sew my backing on just start at one corner of a square and sew to the next corner? then repeat the other corner? if that's a confusing question let me know hahah. i just have no idea how to finish my blanket so that the front and backing won't come apart.
ReplyDeleteI made one a long time ago and tried sewing the x after sewing the blocks together. It seems so much easier to sew the x first. Thanks for the get tips to make a rag quilt. I am sure to try one again soon.
ReplyDeleteThank you for the "step by step" instructions/pics...I have always wanted to make this quilt but never knew exactly how it was done. Might be my next project...
ReplyDeleteHow much fabric did you use??
ReplyDeleteI seen this Quilt on Sat and needless to say had to make one I finally got it done this am that is 2:00am on Tues morning....
ReplyDeleteLove it.....
Super cute, I will be doing this for sure!!!!
ReplyDeleteThank you for this tutorial and the pictures at each stage are really helpful for someone like me... I can compare and make sure that I am doing it right!! My mom makes GORGEOUS quilts all the time and I always think "I could never do that" but maybe I could if I can learn on something that's not so intricate. Thanks again!
ReplyDeleteI made one of these using leftover flannel from other projects for my dad for his birthday. He loved it! It sheds a LOT though - hopefully this will get to be less as it is washed more. Thanks for the great instructions :)
ReplyDeleteStunning and very inspirational. you have such talent. I too am in the process of making one, and now I have my mother in-law interested too. Thanks so much
ReplyDeleteYour quilt is beautiful! I am just starting one for my son. I have a question- as you sew the squares, do you sew all the way to the corners, or do you stop about where the batting begins- or does it matter?
ReplyDeleteThanks in advance for the answer!!
Lovely finished product! Check out this site which specializes in rag quilting patterns and fabrics and even quilt kits: www.JubileeFabric.com
ReplyDeleteYour colors are great together. I love t do rag quilts the are so much fun and easy to make. Something I have been doing is using the decorative bandanadas cutting in half and using them for front sewing two different color peiced together . If I don't want to use batting I use a heavier backing like fleece they are warm and easy to make. Thanks for sharing
ReplyDeleteI LOVE this quilt and the colors you used are awesome. I pinned it in the hopes that I can be inspired to make one soon.
ReplyDeleteIm getting ready to make this beautiful quilt. Thank you soooo much for sharing it. I have the squares and batting cut already... Then it made me wonder... How do you finish the edges along the outside edge of the quilt? I understand the rest, but I have no idea how you finished the trim on the outside. Did you just sew a finighing seam around the outside with a half inch allowance, then cut it too so that the edge will fray to match the other exposed edges between the squares?
ReplyDeleteYes, I just stitched around the edges and let them fray.
DeleteThank you! Thank you! Im a little over half way done sewing the X's across the squares. :) I can't wait to see it when it's done. I appreciate it.
DeleteI love the idea of this quilt. I'm in the middle of making one for my great neice in pinks and lime greens. I do like the idea of putting white flannel inbetween the layers and may try that next time. I think it would make a great baby quilt that way.
ReplyDeletelove it---since my kids are long grown---i will make one for my guest bed.
ReplyDeletetwo impt questions - you obviously made a twin size(?) for your daughter----how much fabric yardage wise did you use?
thanks! karen
you could also use a blend of contrasting colors for the back side of the quilt to make it more interesting.
ReplyDeleteI found this tutorial on Pinterest and I have one question. Do you know how much fabric is needed to make this? It's a great tutorial but it doesn't say how much fabric and batting you started out with before cutting all the squares. IF I ever decided to tackle this project I'd be making a queen size quilt. I imagine it would take quite a few yards of fabric but it would be good to know before the project is started. Thanks!!
ReplyDeleteI'm sorry Judy...I don't know for sure how much I used. I used scraps from various projects! Calculate how many squares you want and then just start cutting and counting :) have fun!
DeleteHow many squares are needed for the top of a twin size quilt?
ReplyDeleteIt depends :) You have to calculate how big you want it to be and divide those numbers by the size of squares you want to make!
DeleteSounds like you have to be a math whiz to do this one! LOL I asked a similar question because I'd want to make mine from store bought fabric so I could choose my color scheme. You're going to have to figure out how big you need the quilt in inches. Just measure one that already fits the bed. From there you have to figure out how many 7 inch squares you'll need in total. You also need to figure out how many squares you can get out of a yard of fabric (which will be determined by how wide the fabric is that you buy - some are 45", some are 60"). Yikes. That's way too much math for me! I wish there was an easier way to figure it out. I think I'll pass on this project but thanks for the tutorial anyway!
DeleteThere's an easier way! Type in www.quiltcalc_loader.com and it will bring up a chart that is fun to use and quite accurate. Or http://vrya.net. Fascinating and fun to play with. Just follow directions.
DeleteThis is just beautiful! Thanks for the inspiration!
ReplyDeleteJust beautiful! I'm not very crafty, but I think I could manage this! Thinking I might try it with bigger squares and use the fronts of old t-shirts that my husband doesn't want to throw away. What do you think?
ReplyDeleteLinda, That sounds lovely! Have fun :)
DeleteI love it, but this is the vaguest tutorial I have ever read. Seems like you rushed it as much as you did the quilt itself. Better elaborated steps and clarification would be appreciated. This reads more like a 'see what I did' sort of post than an actually helpful 'how to'.
ReplyDeleteI think when I make one (when I get my sewing machine repaired!) I will try a collection of colors of washcloths to make my quilt pattern. Then use each as the squares for the quilt. You will need to measure the size of the bed with additional squares for each of the 4 hang-overs. Measure a washcloth and see the number needed for the quilt. Yes, it will be rather expensive as compared to the cloth squares, but it will be best to invest in a good quality of washcloths. Looking forward to it!
ReplyDeleteI'm sure I'll get around to making this. I have lots and lots of fabric pieces with maybe only buying a special color or pattern. I have made 4 quilts for my grandchildren (with one yet to go) with a similar idea only I have a regular pattern. This quilt has larger pieces that make either a dog with long ears, a cat or a bear. Basically the same pattern with a few different pieces for the head. This idea with the squares is great! I've seen them made but haven't tried it yet. But I will!
ReplyDeleteI haven't read all the posts, and someone may have already posted this, but for easier sewing, you can cut a square of white flannel for the batting. I make baby quilts, and use this all the time. If you cut with a rotary cutter and board, you can quickly have several squares cut at a time! Sewing the flannel is MUCH easier than wrangling that piece of fiber.
ReplyDeleteThese work best using flannel or homespuns and fray with one wash. I made one and just used a rotary cutter to make perfect squares. Love the colors!
ReplyDeleteI have been wanting to make my first quilt for a really long time now but have always been scared of all the fussy cutting & perfect measuring. I LOVE LOVE LOVE your quilt! Finally, I feel like this is one quilt I can try & actually finish long before I start to feel overwhelmed, AND it will look fabulous when I'm all done. Thanks for sharing. :)
ReplyDeletemaking a small version in all purples for my baby cousin that is on the way. It is looking good so far, but I just now sewed the first row together, so hopefully my lines will all match up as i finish it.
ReplyDeleteWe have a quilt like this that my mother-in-law made. I love it but was never really sure how she made it. Now I know! Thank you... I intend to make one (or two).
ReplyDeleteHi Dana, I love your blog! I have always wanted to sew but never had the confidence. I love this quilt so wish me luck I'm making a pillow to start with.
ReplyDeleteIt looks fantastic ;) greetings from Germany ...tani
ReplyDeleteHi DAna,
ReplyDeleteLove your blog...Just found this....Going to attempt this quilt for my daughter!!! Maybe I will finish when she is in college!!
Smiles,
Tara
Dana,
ReplyDeleteMy mother just passed away on April 1st. I went to Florida to clean out her things, and having previously pinned this quilt idea to my Pinterest site, had to keep some of her shirts and other odd items to use to make two quilts. One for me and one for my sister. I have not sewn in...ohhhh...twenty years, so this will be fairly new to me. But my Mom was such an eclectic dresser (fun flower patterns, paisleys, odd patchwork patterns) that I just couldn't pass this up. I have read through the comments, but am still unsure about how the pieces go together once you have your squares made? Is it best to make 10X13 rows? And if there are good fabric pieces on each side, which is what I am imagining from your tutorial, how do you decide which is the 'wrong' side?
I should've shown photos of the back of my quilt. The back of all the squares are teal.So on my quilt, those are the "wrong" sides. You could, if you want, have a random pattern on both the front and back of the quilt and then there would really be no "wrong" side for each square, but you would still need to sew all the pieces so that the fringe is all on the front side of the quilt.
DeleteJust wanted to say thanks for posting all the pics and instructions. I just finished cutting all the squares and the batting. Can't wait to piece it all together. Thanks again for the inspiration!
ReplyDeleteCould this work with old t-shirts for the fabric? I want to make a quilt from my boyfriends outgrown shirts.
ReplyDeleteThe Accuquilt Fabric cutters both have Rag dies, the smaller is 5 1/4" square and the larger one is 8 1/2". The dies will cut the flannel or cotton, including the bits that you would normally cut by hand later.... you know, the bits that gives you an aching wrist! I've made two, my grandsons love them, and as each square is "quilted" before joing them together, it is so easy to make on a home machine. Thanks for the tutorial, it is great to see people getting inspired to quilt.
ReplyDeleteWould this work using old t-shirts or would it fray differently?
ReplyDeleteI think it would fray differently. T-shirt edges tend to roll up more then fray. But I still think it could work...you might just get a different look in the end, but that would be alright :)
DeleteLove, love, love your quilt! it's such a happy looking quilt. Gorgeous!!! And your instructions are the first quilt instructions I've ever read that I actually think I can follow. Thank you for making the process easy enough for me to try. :)
ReplyDeleteSo pretty. I am going to tuck this away to do over the long, cold winter. Just gorgeous.
ReplyDeleteMade a gray and yellow one for my granddaughter - it turned out great, and I think I'll make some more for Project Linus. I didn't have any problem with the instructions, they were perfectly complete, and I loved that you showed so many pictures.
ReplyDeleteThenks
Absolutely beautiful.
ReplyDeleteThis comment has been removed by the author.
ReplyDeleteGorgeous. My daughter made a rag quilt for her sister's little boy - more olive greens and browns of course. But I've never seen the directions. How is the outside edge of the quilt finished?
ReplyDeleteI can't wait i am going to make one for my grandbaby who is due in July and like you i will probably wait till the last min. but homemade is always such a nice gift it means the person put alot of thought into it. I can't wait for her or to do this for her.
ReplyDeleteKelly, can you tell me what size bed you put this quilt on? I am going to make one for my 4 year old daughter and she has a full size bed, so want to make sure I have the correct dimensions. Thanks so much! I can't wait to start this project. :)
ReplyDeleteIt's a single bed. :)
DeleteFinished mine and I love it!!!
ReplyDeleteI hope this isn't a repeat question, but how does one finish the edging on the quilt? I don't see instructions for this part & blowing up the pictures you provide doesn't help me see what you've done.
ReplyDeleteI just stitched around the outside edges a few times and let the quilt edges fray.
DeleteHow many rows do you think i would need for a full size bed?
ReplyDeletehow big is full size?
DeleteSorry, I totally just created new posts. It's in between a twin and a queen. Also, How much fabric should I buy, like in yardage. I don't have any so I will be buying from scratch. I don't sew much, in fact it's been like 3 years since I last sewed, but you have inspired me with this quilt. I love it!
DeleteA double size quilt is normally about 86x86 inches....so 14 or 15 squares per row, and 14 or 15 rows.
DeleteI can't say for sure how much fabric I used because I used scraps. But if your fabric is 45" wide and you are cutting 7" squares then you can get 30 squares per yard. If you use a fabric that is 60" wide you will get 40 squares per yard.
awesome! thank you so much!
DeleteYou're welcome! Have fun sewing :)
Deletesmaller than a queen
ReplyDeletein between a queen and a twin. Also called a double
ReplyDeleteI've never seen a rag quilt that was not done in flannel...the material you used wasn't flannel right? Because I love it, and since I don't have any flannel scraps I would love to try with regular cotton fabric.
ReplyDeleteThat's right...I didn't use flannel. I'm actually not a big fan of flannel. I've always heard it's the best thing to use for rag quilts, but what can I say....I'm a rebel ;)
DeleteGoing to give this a try for Christmas. Hopefully I won't wait until the night before- great post!
ReplyDeleteI used this tutorial to make my own (much larger!) version. I wrote about it here http://aliciasbloggygoodness.tumblr.com/post/23691086959/quite-quilty giving you credit, of course. I love your ideas and your blog!
ReplyDelete