How to Tie a Baby Wrap: A Simple Guide for Parents
Have a fussy baby? Need your hands free while taking care of your newborn?
Well, baby wraps will save you from such hurdles! Tying a baby in that soft woven fabric gives it the feeling of a mother’s womb! Babies need care, comfort, and love. And, these cozy wraps help us fulfill their needs.
Guess your baby’s cues, practice the wrapping techniques, and trust your parental instincts for confidently tying your baby in a wrap!
I learned to use wraps from my first baby, Avery! My mom taught me to use these wraps. I cannot tell you how thankful I was to my mother for these baby wearing lessons. Of course, my supporting hubby Terry was there whenever I needed an extra helping hand.
If you have become a parent for the first time and are confused about using these baby wearing tools, I am here to help you! Parenting can feel overwhelming at first. Believe me, I got you!
That’s why, I have dedicated this blog post to all parents and caregivers who are keen to learn how to tie and use baby wraps properly.
Table of Contents
Understanding Baby Wraps
Imagine you have welcomed your newborn and after some days, you’ll start your home/office chores while caressing your little one. Now many of us go online and look for baby wraps. After seeing so many options, anyone may get confused about selecting the perfect wrap.
After I had Avery in 2008, I visited a nearby baby essentials store to get those wraps. I went through the same.
Now, with regular research and after raising 6 children, I understand what you feel!
YOU WANT THE BEST FOR YOUR BABY, and I am here to help you with that!
But, we need to learn the basics first!
Types of Baby Wraps
So, let’s understand some basic types of baby wraps first:
- Wraparound carrier
- ABC (Asian Baby Carrier): Meh Tai
- Podaegi (a Korean Style Wrap)
P.S. – I’ve already covered about my top baby carrier and wrap picks in my previous articles, you can check that out to view my recommendations.
What Is a Baby Wrap?
Before we learn how to tie a baby wrap, let’s briefly talk about what actually is a baby wrap.
A wraparound baby carrier (also known as wraps) is a long piece of fabric that parents use to carry their baby securely. It’s adjustable, making it easy to ensure your baby is comfortable at all times.
What does a mom need when she can pamper the little one tied in a wrap while attending to her older children? These wraps are the most comfortable, and easy to use for babies up to 6 months old.
These wraps have 2 major types:
- Stretchy wraps
- Woven wraps
| Stretchy Wraps | Woven Wraps |
| Made from soft knit fabric. | Made from cotton, linen, hemp, etc. |
| Less durable | More durable than stretchy wraps |
| It is more stretchy and suitable for newborns for a snug fit (below 6 months) | It is less stretchy and supports the neck and back in heavier/older babies. |
| Mostly used for front-carrying position | Used for front, back, and hip positions. |
These wraps come in different sizes (XS to 4XL) and thickness levels, ranging from 100-GSM (thin) to 300-GSM (thick). The choice depends on fabric quality, thread count, and personal preference.
Recommended Reading: Baby Carrier Positions By Age
How To Tie a Baby Wrap?
Whether it is woven or stretchy, both are a piece of long fabric. I used Boba Baby for Sawyer and KeaBabies wrap for Theo. They loved to snug in those silky soft wraps for hours.
YES! Each baby has a different choice and comfort! Tying a wrap is a SIMPLE yet CREATIVE process.
You just need to find the perfect way to tie these wraps for a comfy feel for your baby.
Here are the steps to tie a baby wrap:
A. Front Carry (Face-In, for Newborns)
Front carry face-in positions are recommended for babies below 6 months old for the utmost safety and secure placement. One must use stretchy wraps as babies have soft and delicate skin. I mostly used these 2 tying techniques for my babies:
1.1. The Classic Method: Starting From the Stomach:
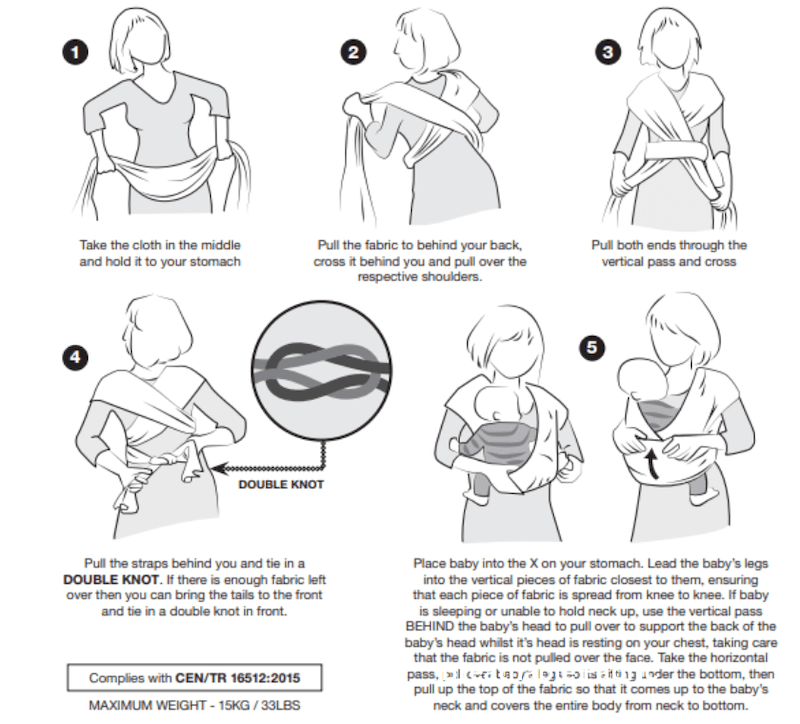
- Find the middle of the wrap cloth and hold it on your stomach. You can fold the fabric in half to find the middle.
- Nowadays, many wrap manufacturing brands give a brand label in the middle, so the caregiver can find the midsection easily.
- Gently pull the wrap behind your back. Cross both ends and pull them over your shoulders. This will help to relieve pressure on the back and shoulder after putting your baby in this wrap.
- Bring the fabric in front and pull vertically downwards in a cross. This helps for optimal weight distribution in front, back, and sideways.
- Again, pull the fabric straps behind your back and tie them with a firm double knot.
- If the fabric is left, pull it in front and tie it again on your stomach for more support. TADA! That’s done!
- Now, gently place the baby into the front side X area of the wrap. Cover its knees properly. Rest the baby’s head on your sternum and use the vertical pass to cover and support your baby’s head and neck. Cover the baby’s legs and entire body till the neck using the horizontal pass.
1.2. Starting From Your Chest:

- Find the middle of the wrap cloth and hold it on your chest/ sternum.
- Pull it behind your back downwards (slightly above your hips). Make sure no fabric is left loose or slack in front.
- Make a cross and pull upwards diagonally. The straps should go above your shoulders in front. This relieves the pressure on the neck and shoulders after you put the baby in the tied wrap.
- Pull both ends vertically, hold them together, and pass them beneath the first horizontal layer (which we made on the chest in the first step). Make a cross of these 2 straps. Spread the fabric over your shoulders to get proper support after you carry the baby.
- Again, pull the fabric straps behind your back in the horizontal direction. Tie both ends in a double knot.
- Now, hold your baby while resting its head on your chest. Put both its legs in the cross-section of vertical passes. Cover its neck and back using the same layer of fabric. Your baby’s knees must be below the buttocks (M leg position).
You can refer to this video for visual understanding!
B. Back Carry (for Babies Over 6 Months)
The back-carry position is suitable for babies above 6 months old having proper neck and head control. Good quality woven fabric wraps are perfect for this.
We’ll explore the famous Jordan’s Back Carry and Rucksack Back Carry Method here:
2.1. Jordan’s Back Carry Method(JBC): TAS (Tie-At-Shoulder).
In the TAS method, you tie knots near your shoulder using both straps. It may seem difficult at first. But, trust me. It is way EASIER once you practice it 6-7 times! If you are doing this for the first time, try it on your bed to avoid accidents.
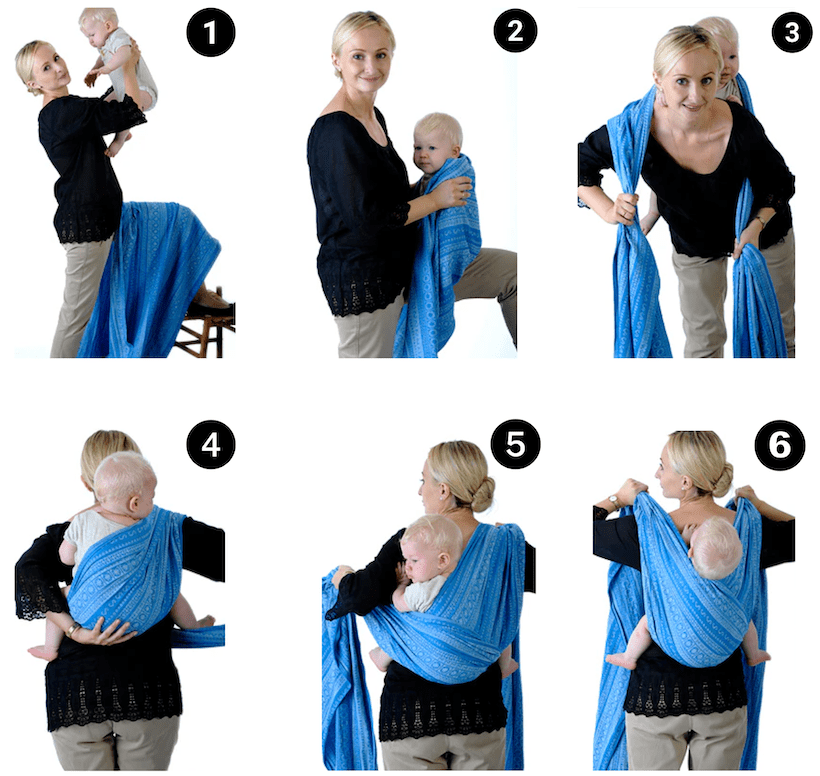
- Put your baby on your lap. Spread the wrap over your baby’s back. Keep one end shorter and one longer.
- Now, put your baby on your back with the wrap fabric spread.
- Pull the short end over your shoulder and the long end underneath the other shoulder.
- Pull the long strap under the baby’s leg and around your waist in the front to form a waist belt.
- Bring the wrap around to the back under your baby’s one leg. Spread that wrap’s end across your baby from knee to knee.
- Pull the wrap over your opposite shoulder in a cross direction. This provides support to the baby’s back and neck.
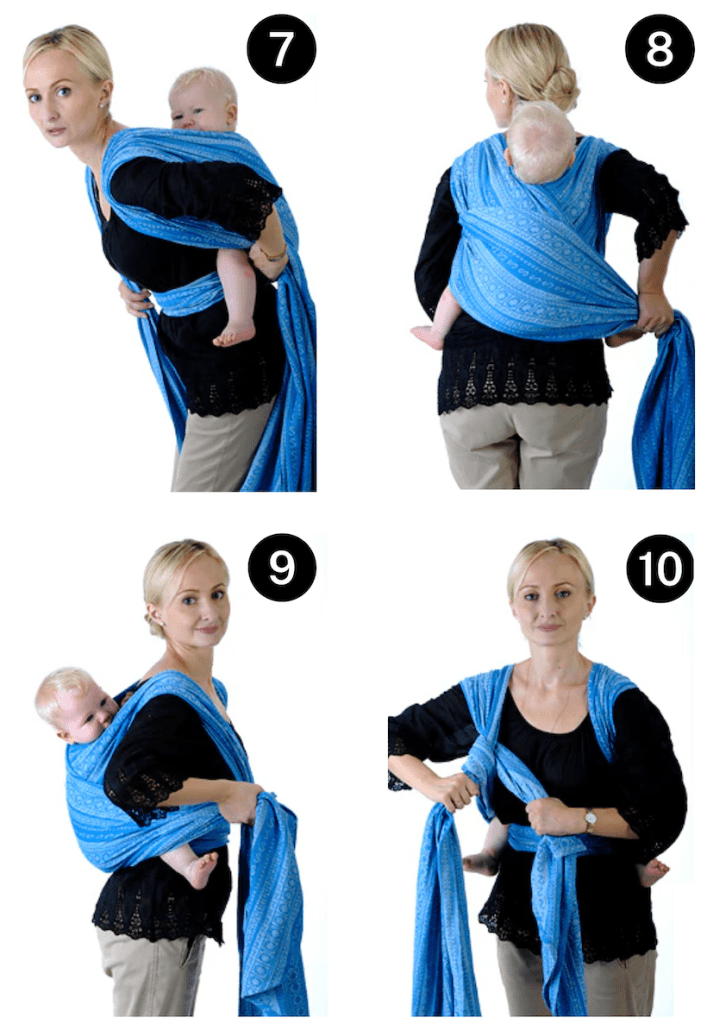
- Pull the longer strap’s end under your arm in the vertically downward path to form a strap.
- Spread the wrap over the baby’s back horizontally, with the bottom end coming from knee to knee. This creates a seat-like area in the wrap for the baby.
- Pull the wrap under your arm. Now, both straps come together.
- This is the Final step! Tie both straps ends in a double-knot near your shoulder.
I loved using this method for Fiona when she turned 7 months old. The wrapping layering and sturdy passes provided so much support for my back and chest.
Watch this video for more explanation.
2.2. Rucksack Carry Method (RUCK):
In my opinion, the RUCK method is simpler and quicker than the JBC method!
Babies naturally have less patience. And, wrapping your baby with this method is like a Boon!
Let’s see how this method works.
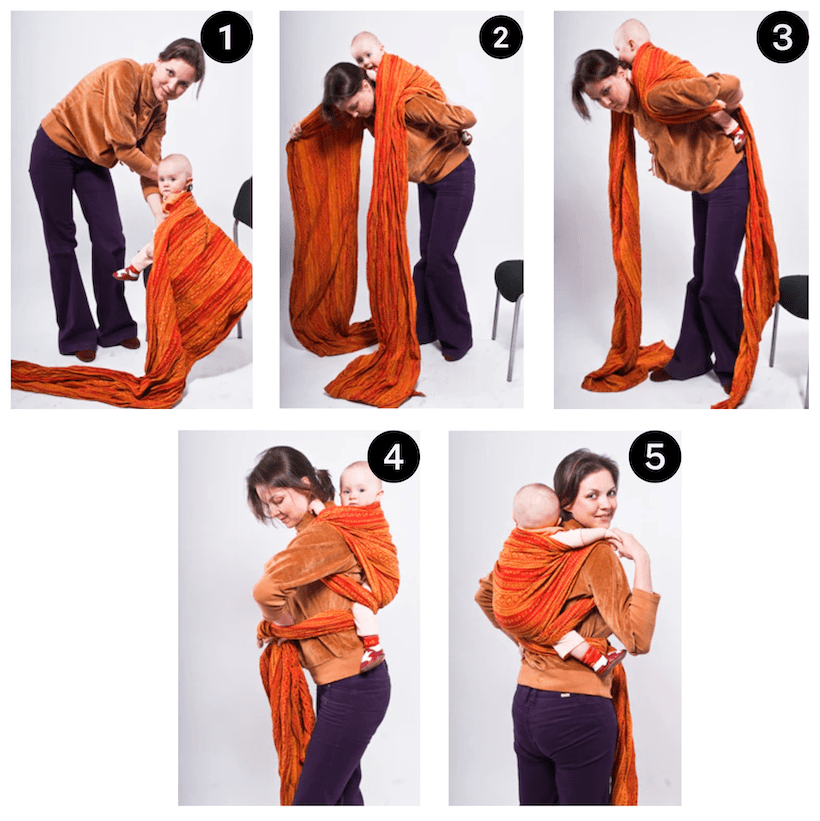
- Find the center of the woven wrap and place it on the baby’s back.
- Put the baby on your back. Pull the wrap on each side from top to bottom over your shoulders. You’ll need to hold your baby continuously with one hand while doing this.
- Pull one end of the wrap backward to form a backpack-like strap. Pass the strap behind your child’s first knee. Then pass the strap under your baby’s second leg. Pull it in front.
There must not be any slacking for a snug fit. Repeat the same process with the second strap. It will form a cross at the baby’s buttocks area. - Pass both straps at the front and tie a double knot on your stomach area.
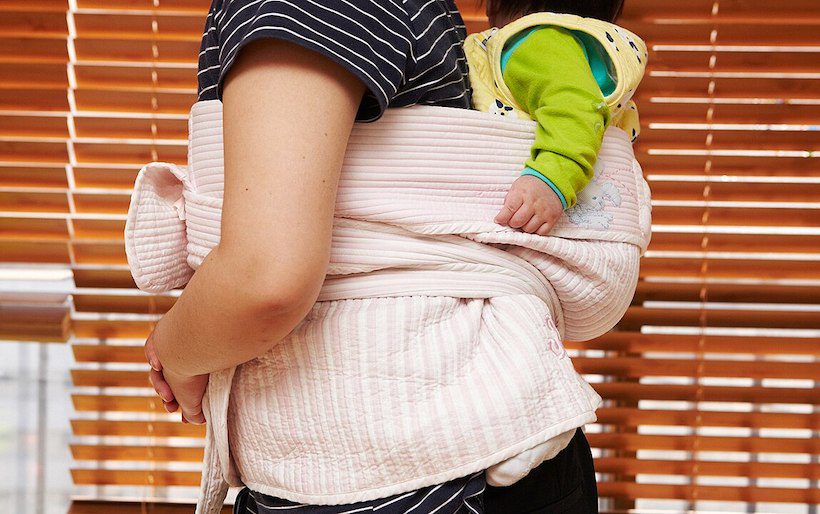
- This is how it should look from the backside.
Tying Other Cultural Wraps
A. Meh Tai (Asian Baby Carrier)
Apart from wraps, some other wrapping techniques are also popular among some cultures.
It is a pre-woven rectangular wrap with 4 corner straps and waist straps. Wrapping is much easier in these straps while maintaining the snug fit.
The word Meh Tai originated in China, which means- ‘mei’: to carry on the shoulders and ‘tai’: strap.
Although, it is less versatile than regular baby wraps. You can wrap the baby in front, back, and hip carry positions using this method.
How To Tie A Meh Tai Baby Wrap?
- Hold the wrap upside down where the patterned area is at your side and the shoulder straps hanging down.
- Pull its straps behind your back at your natural waistline. Tie them in a double knot.
- Now, hold the baby in one hand and use the other hand to rest its head on the upper area of your chest.
- Continue holding your baby with one hand. Use another hand to pull the carrier upwards.
- Cover the baby’s back using the carrier panel with the same hand.
- Pass the shoulder straps behind your back.
- Use one hand to hold the baby and with the other hand- pull one strap from both sides in front in a cross direction.
- Hold the baby and the strap together and pull the second strap in front with the other hand.
- Make sure no straps are loose or slacking from the shoulders. Tie these straps in a double knot at the middle of the baby’s back.
Follow the steps in this video for a detailed explanation:
B. Podaegi (A Korean Style Wrap)
This traditional Korean Wrap especially provides warmth to the mother’s tummy when the baby is in this wrap. You have to strap the wraps under the baby’s buttocks and tie them around the stomach in front. I used these wraps with Sawyer in chilly winters to maintain my and her body temperature!
Watch this video to learn more about this wrapping method.
Safety and Comfort Tips To Remember:
- The wrap should be free from chemicals, toxins, and harmful dyes.
- The wrapping should not be so tight to avoid suffocation for the baby.
- The baby should not be overdressed when you tie the wrap around it.
- Use the correct positions for wrapping the baby according to its age.
Frequently Asked Questions:
What Position Is Safe For Tying A Baby In A Wrap?
Tying wraps in the front position with inward facing is the safest for newborns. For babies above 6 months of age, the back and hip-carry wrapping positions are secure.
How do you keep the baby’s face when you tie a wrap around it?
Your baby’s chin should be up and face sideways for smooth breathing for wraps. You should be able to kiss your baby’s forehead when you move your face downwards.
Final Thoughts
Tying baby wraps around you may feel time-taking at first. It’ll get faster with time, patience, and practice. Whether stretchable, woven, or Meh Tai wrap, you must always trust your paternal instincts to use the right wrapping method.
Also, observe your baby’s cues to check what it loves the most. There can be literally 100s of wrapping methods that you can develop with time. I have just explained some popular ones above. So, learn, keep practicing, and enjoy wrapping your little bundle;e of joy around you.